The Example firmware can be flashed onto the Main Controller using this bootloader:
- Main Controller Bootloader :
https://server.kk-t.eu/api/v1/share/File?file=iQExternalExampleMain_Bootloader.bin
After flashing the boot-loader, connect the App and it will automatically detect the fixture and suggests the firmware update.
Also you can flash and debug the source code as well. We do provide the source code pre-configured for the following IDE’s to make it easy:
- STM32CubeIDE ( https://www.st.com/en/development-tools/stm32cubeide.html)
- Keil uVision 5 (https://www.keil.com)
You can download the source code from there:
This example consists of the following:
- Example Bootloader (Single Bank DFU for simplicity)
- Example Application (On/Off button, Controlling 9x WS2812 Leds, Reading battery Gauge)
- Example Bootloader Update (Example how to change the bootloader if there is an issue)
- Vision Library
- Bootloader File Generator ( Just an example to pack the resulting .bin files and send it to the fixture using the app. This project takes the application .bin file and adds a header with a signature, file length and file CRC)
The Application and the Bootloader are using the provided Vision library for the SPI Interface and the RDM Implementation:
- Vision SPI Library (SPI_V3): Explained in documentation under Software -> SPI Interface -> Vision SPI Library
- RDM Vision Library: Explained in documentation under Software -> RDM -> Vision RDM Library
- ManagedFlash Library: A simple flash abstraction
- Button Library: A simple asynchron button implementation
The code structure of the example application is as following:
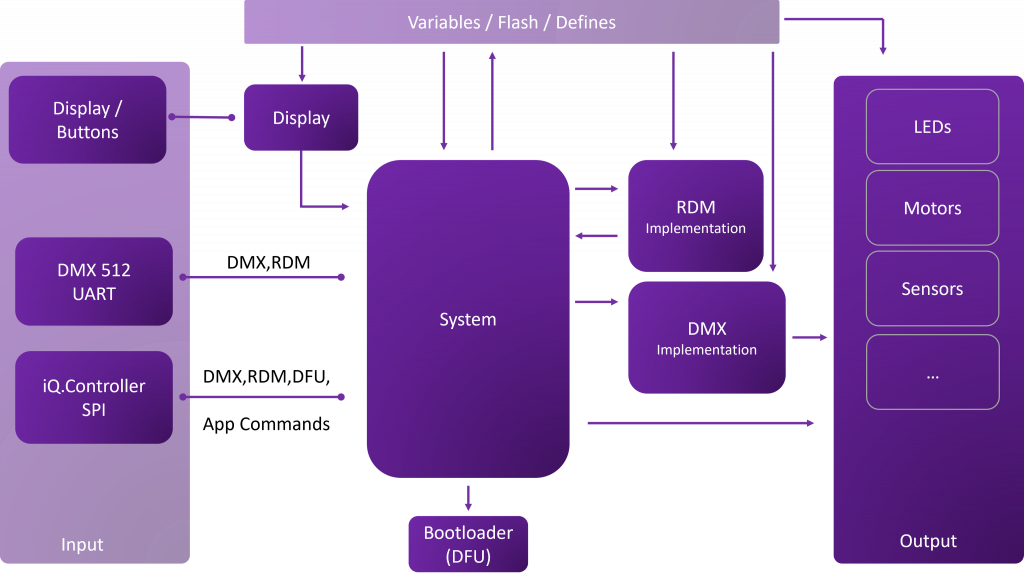
Example Application Notes:
The program entry ‚main.cs‘ can be located in ‚Core/src‘. It’s where the necessary hardware configurations are carried out. Following the hardware configuration in ‚main(void)‘, you’ll encounter the ‚InitSystem()‘ command. This command is crucial for initializing the example and all its associated callbacks. The majority of the code operates on interrupts. For any other operations, there’s a Task routine within the while loop. It’s important to note that this is just an example, and replicating it exactly is not mandatory but simple.
Assuming all hardware-related functions are configured correctly, the VISION SPI library will automatically configure the Vision Controller in an interrupt-based manner.
In Main.cs/Main.h, you’ll find all hardware-related aspects. Every function that requires translation to a hardware function is documented here. For instance, setting the SPI CS Pin for communication is translated here to a defined GPIO.
In defines.h in the ‚Application/inc‘ you’ll find all fixture-specific definitions like RDM Defines or fixture name.
All settings, such as Input Source or DMX Personality, are buffered in variables.c. If essential parameters are altered via associated functions, the program reloads the vital interfaces and stores the settings to the flash memory.
The system_implementation.c file in the ‚Application/src‘ contains the main application code. The System encompasses the following significant components:
- Receiving DMX
- Receiving RDM
These functions should be invoked from every possible input source, such as DMX512, WDMX, ARTNET, VISION, and so forth. They are designed to handle various behaviors accurately.